Our love for Crochet is growing each day. And Crochet really has blossomed. There are so many beautiful designs to do & yarns to use. We’re looking forward to trying out some new designs and creating more patterns soon.
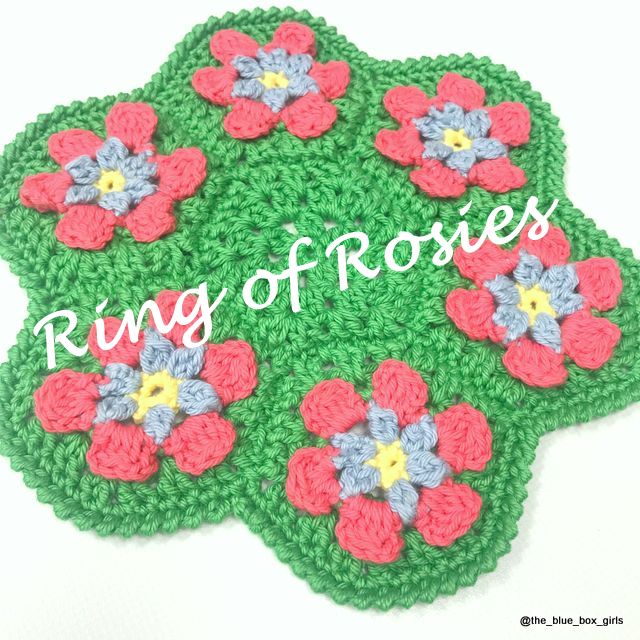
Today we have the honour of sharing our FREE PATTERN with you. It is a quick project. With UK Stitch Terms. A gorgeous table centre, perfect to make as a gift for a friend or display piece for your home. It is 23cm wide and would look great with a vase of flowers displayed in the middle.

~ Supplies Needed for Ring of Rosies Table Centre ~
Patons Cotton Blend 8ply (95m);
2 Balls of Fresh Green (24).
1 Ball each of Yellow (6), Cloud (34), Coral (26).
4.00mm Crochet Hook.
Yarn Needle for sewing in ends.
Abbreviations;
ch – chain col – colour cont – continue dc – double crochet
rep – repeat RS – right side sp(s) – spaces ss – slip stitch
st(s) – stitch(es) tr – treble WS – wrong side yoh – yarn over hook
Special Stitches;
2trCL (2 treble cluster) – (yoh, insert hook in st, yoh, pull yarn through, yoh, pull through first 2 loops on hook) twice in same st, yoh, pull through all 3 loops on hook.
3trCL (3 treble cluster) – (yoh, insert hook in st, yoh, pull yarn though, yoh, pull through first 2 loops on hook) 3 times in the same st, yoh pull through all 4 loops on hook.
Dec (decrease) – Start a dc but do not finish it (keep on hook) then do the same again in the next st, then yoh and draw through the 3 sts on the hook all at once (1 st decreased).
Crab St – Do not turn work. With right side facing, insert the hook in the next st to the right, draw loop through, yoh, and draw through both loops on the hook. Repeat right round the rug for a very smart finish.
Magic Circle – Make a loop around your forefinger with tail end of yarn on the right and ball on the left. Insert hook in loop and wrap the yarn coming from the ball around the hook. Pull yarn through so you have 1 loop on the hook. Yoh and pull through the loop on the hook to make 1 ch to begin the round. Work as many dcs or whatever st you are using, into the circle (over both strands) as required by the pattern. Pull the ends of yarn tight to draw up the circle, so that you have no hole left in the middle.
Let’s Start;
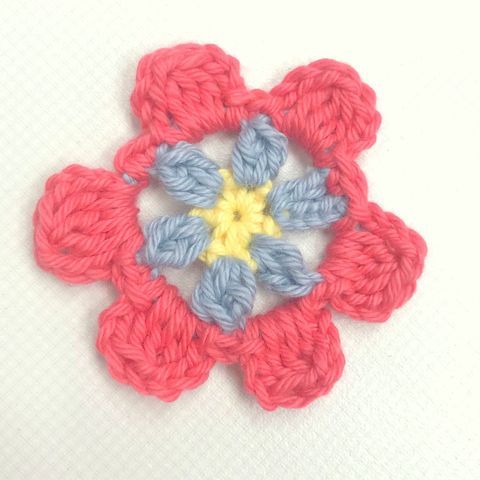
Make 6 hexagons with petals, and 1 plain one, working the ends in as you go if possible. Sew in remaining ends of all blocks.
Using Col 1 (yellow), make a magic circle, 1 ch, 6 dc in circle, break off col 1, join in Col 2 (blue) with a ss in first dc.

With RS facing, continue in rounds.
Round 1 3ch, 1tr in same place as last ss (counts as first 2trCL), 2ch, *2trCL in next st, 2ch; rep from * to end, join with a ss in first tr (6 clusters). Fasten off col 2.
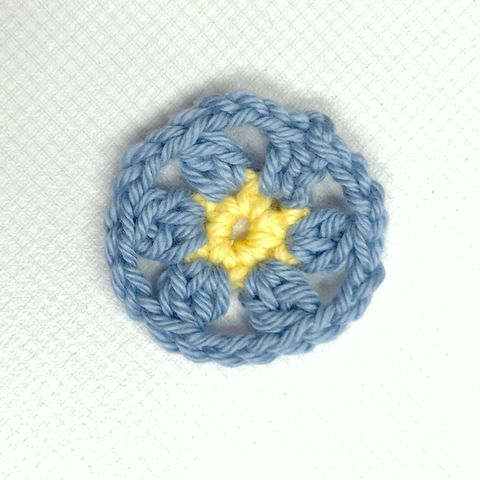
Round 2 Join Col 3 with a ss in any 2ch sp, *3ch, [3trCL, 4 ch, 1ss] in same sp (1 petal made), 1dc in top of next 2trCL, 1ss in next 2ch sp; rep from * working last ss in same sp as first petal (6 petals). Fasten off Col 3.
Round 3 (make ch spaces): Join Col 4 (green) with a ss in top of any dc between petals, 1 ch, 1 dc in same place as ss, * keeping petal at front of work, 2ch, 1dc in next dc (between next 2 petals), 2ch, 1dc in next dc; rep from * to end, join with a ss in first dc (6 ch sps). Do not fasten off, cont with Col 4, (green).

Round 4 1ss in first 2ch sp, 3ch (counts as a tr), [1tr, 1ch, 2tr] in same sp (1st hexagon corner), *[2tr, 1ch, 2tr] in next 2ch sp (2nd hexagon corner); rep from * 4 times more, (6 hexagon corners) join with a ss in top of first 3 ch. Do not fasten off Col 4.

Round 5 Ss to the next corner 1ch sp, 3ch (counts as 1 tr), [1tr, 1ch, 2tr] in same sp (corner), 2tr in next sp between corners, * [2tr, 1ch, 2tr] in 1ch corner sp, 2tr in next sp between corners; rep from * to end, join with a ss in top of first 3 ch. Fasten off.

Now the Centre Hexagon (Green) Make 1
Make a magic circle, 1ch, 6dc into ring, ss into 1st dc.
Round 2
3ch (counts as 1 tr), 1 tr (counts as 1st 2trCL) in the same sp as the ss, 3ch, * 2trCL in the next st, 3ch; repeat from * to end, join with a ss in 3rd ch of 1st tr. (6trCLs)
Round 3
Using ss, crochet the blocks tog with the plain block in the centre.
Work a row of Crab St around the outside making 2 sts in each corner.
Round 3
Ss into next 3 ch sp, 3ch (counts as 1 tr),1tr, 1ch, 2tr, in same sp,(1st hexagon corner ) * 2tr, 1ch, 2 tr, in next 3ch sp; repeat from *4 times more, (6 hexagon corners), ss into 3ch of beginning of this row.
Round 4
Ss to the next corner 1ch sp, 3 ch (counts as 1tr), [1tr,1ch,2tr] in same sp(corner), 2tr in next sp between corners, * [2tr,1ch,2tr] in 1ch corner sp, 2tr in next sp between corners; rep from * to end, join with a ss in top of 3rd ch.

Using ss, right sides tog, crochet the blocks tog with the plain block in the centre.
Work a row of dc around the outside edge working 2dc in each outer (not inner) corner.
Work a row of crab st around the outside.

Enjoy making this gorgeous piece.
♥ The Blue Box Girls